Cirris Easy-Wire Software is packed full of useful tools and features to make creating test programs as easy and accurate as possible. Some of the lesser known features are incredibly helpful, but often under-utilized. How many of these tools have you used?
Detect Error Location
The Detect Error Location (Which-End) feature senses the wire resistance and capacitance going to and from the error. This gives the operator an idea of which end a cable the open or short is located.
To turn on Detect Error Location:
Click Create Test or Edit Test and go to the Set Test Defaults tab.
In the Test Window options (third section down) select the Detect Error Location (Which-End) button.
In the Which-End Error Count window, set the maximum number of location errors to detect during a test. The default is ten, but you can adjust it to be higher or lower. Setting this value to a lower number will prevent the tests with many errors from significantly slowing down. After the test reaches the number of errors in this dialog box, the tester will continue to report errors but without an Error Location. Press OK when finished.
Note: This feature has two main limitations. It can significantly decrease test speed, and it is not effective on small devices where fixturing resistance or capacitance is close to or higher than that of the device-under-test.
When running the test, information about the error location will now be available in the test window. If you decide the test is too slow, you can turn off error location from the test screen. Click the button to toggle the feature on or off.
The “Try It” Button
Easy-Wire has a “Try It” button in the test instruction window. With your cable connected to the tester, you can add an instruction and click “Try It” to see how a specific instruction will function. The Status and Measured fields will update to show the results.
To use the Try It feature:
In the Test Program Editor, go to the Define Instructions Tab.
Select an instruction from the dropdown list and click Add Instruction.
The Wire instruction window will open. After adjusting the specifications for the instruction, click the Try It button.
Note: The device must be attached to the tester for the Try It feature to work.
The Test Probe
The test probe is an overlooked tool that can add control and accuracy to your test process. Not only is it useful for attaching connectors, but it can also be used to troubleshoot errors and complete instructions.
Use Probe in Tests:
In the Test Program Editor, Define Instructions Tab, you can add a Probe instruction. During the test, the operator must probe a particular test point to complete the instruction. This instruction is useful when testing cables with unterminated raw wires or ring terminals.
Troubleshooting:
At the bottom of the Test Program Editor, the Probe point button allows you to view the point information when you probe a test point or connection. You can also change applicable probe settings for a test program. A tester must be attached to use this option.
Customize High Voltage by Net
When building or editing a test program in the View Nets tab of the Test Program Editor, there is a button below the netlist called Customize High Voltage Tests by Net. Clicking this button allows you to create high voltage settings for single or groups of nets in your test which have different requirements. If the tester finds an error during the standard hipot section of a test, the test will not perform the custom hipot part of the test.
How to Customize High Voltage by Net:
In the Test Program Editor, View Nets tab, click Customize High Voltage by Net.
In the Select High Voltage Parameter Group section, click Add to configure new high voltage test settings to be used on specific nets.
Select the newly created parameter group as well as the net(s) and click the Add button from the Ad HV Instruction section.
For more instructions, see the User Manual and the Help System.
Smart-Lights® Devices
Smart-Lights devices connected to adapters cables and registered with the software allow you to attach them in an order different from the original test program. Without Smart-Lights devices, the adapter cables must be attached in the same order, or the tester will not recognize them.
How to set up Smart-Lights devices:
Attach Smart-Lights devices to your fixturing cables using zip-ties, heat shrink, screws, or another method.
Attach the Smart-Lights device to any two consecutive test points on the fixturing adapter.
Connect the fixturing to the tester and register the Smart-Lights device in the Connector Registry.
Under the Smart-Light tab, click Scan for Smart-Lights devices. Then click Register and complete the probing process.
Customizable Test Reports
Add your company’s logo, use report configurations depending on the customer, and export to CVS or PDF. Do all this and more with customized reports.
How to format reports in Easy-Wire:
In the Set Test Defaults tab of the Test Program Editor, click on Configure Reports / Auto Print in the Report Options section of the window.
Select which report you wish to edit.
Edit the layout and information on the report. Click the X in the top right corner when finished and save your changes.
Cirris Connector Generator
The Auto-generator tool will add connectors to the Connector Registry from the Cirris Connector Generator. Using this tool allows the user to bypass the work of creating a connector, including creating an image of the connector.
To Auto-generate a test program:
Open the Connector Registry in Easy-Wire and click Create Connector.
Make sure Auto-Generate using Cirris Connector Generator is selected. Enter the exact mil-spec part number for the connector you wish to generate and click Forward>>.
If the software can generate the connector automatically, you can complete the process by choosing whether to include the shell and editing the connector graphic.
All connectors generated in the Cirris Connector Generator will have the ~ sign next to it.
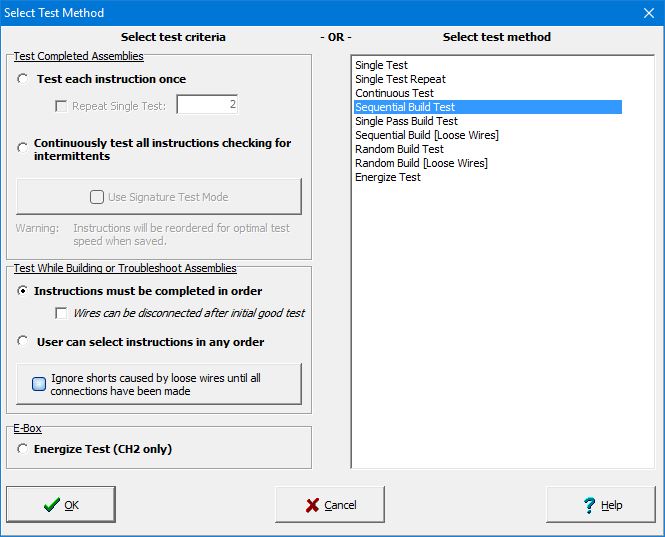
Test Methods
Test methods are useful for building a cable while it’s connected to the tester. For example, Sequential Test ensures the operator identifies and inserts wires in a sequence; Random Test allows them to attach wires in any order.
To change the test method:
In the Test Program Editor under the Set Test Defaults tab, click the drop-down arrow next to Test Method in the Test Process section.
In the new window that opens, change the test method based on the criteria or by selecting the test method. (One side of the screen will update the other side based on the selection.)
Note: An explanation of each test method is found in the User Manual or the Help System.
Text to Speech
Easy-Wire has several features that use volume including the Speech features. For example, when you probe a point, the software will read you which point you probed.
To turn on the Text to Speech feature:
In the Utilities menu under Setup System Options, select the Speech tab.
Fill in the information. Press OK when finished.
The Easy-Wire Manual and Help System
The Help System has been around a lot longer and has more information, but the most current and up-to-date information can usually be found in the manual.
To access the Help System:
Pressing the Help button found on any screen of Easy-Wire will bring you to the Help System. You can then read information pertaining to the concurrent screen in Easy-Wire. You can also navigate the Help System to find more information on the software and testing.
To read the Easy-Wire User Manual:
Download the manual from the Easy-Wire page of the Cirris website.
Find a digital version of the manual on the flash drive that came with your tester.
Order a paper version of the manual from your Account Manager.
We hope you learned something useful about Easy-Wire software. This software is specifically designed to give you the best testing experience. If you have questions about Easy-Wire or any of our products, contact Cirris.