A common testing problem is determining whether a reported failure is truly a problem with the DUT (Device-Under-Test) or a problem with the test interfacing. Test connectors wear out with repeated usage, pins break, plating is worn off and intermittent readings can occur. Defects in the testing interface will look like defects in the DUT. The bottom line? You need a way to ensure your test fixturing is ‘Error Free!’
How do you ensure that your test fixturing is working properly no matter what type of adapter or fixturing you use?
BUILD YOUR OWN TEST BLOCKS
Whether you use adapter cards or adapter cables, if you implement a ‘verification process’ you’ll be assured that you are testing with good adapters or fixturing.
There are a few ways you can go about testing your cirris adapters. One is to build a shorting test block for the adapter.
Option 1:
Step #1: Make a Shorting Test Block for each adapter/connector/cable interface you test
cables with.
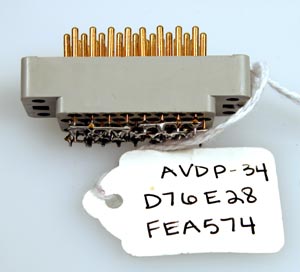
How do I make the Test Block? Solder all the pins together on a mating connector of the connector on your adapter/connector/cable interface. (You can short all the pins together or, if more convenient, any pattern of connections – but it is necessary to include every pin in the connector).
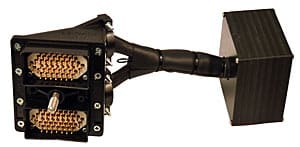
Some photos on the right are shorting blocks designed to mate with a variety of connector types used on Cirris testers. There are no limits to the variety of connectors which could be turned into shorting blocks.
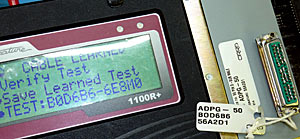
Step #2: Learn and verify each TEST BLOCK. Because the Test Block has interconnections, it will have its own Signature when it is “learned” by the tester. Verify that every point on the Test Block is included in the wire list. Use the Cirris tester to print out the “wire list” then verify it just as you would a learned cable. (Remember that the location of the adapter on the tester is also important. When verifing an adapter it must always be in the same position on the tester.)
Step #3: Label each TEST BLOCK. When you are confident that your test block is correctly verified and all pins are included then LABEL the test block with the KNOWN GOOD Signature.
TESTING YOUR ADAPTERS
Test Blocks may be created using the connector only, or the connector with a short piece of cable attached. (Suggestion- when you have a “bad cable” cut the connectors off leaving a short piece of the cable attached. Use these to create shorting test blocks)
Step #4: TEST your adapter!
To test your adapters simply plug your Test Block on to the tester and learn it. The signature should match the attached label. Unplug the Test Block and when the tester says ‘Ready to Test’ plug it back on. Use the Continuous Test mode to check for intermittent problems. Grasp the Test Block and move it from side to side. If you can cause a failure the adapter is probably worn out, dirty, or it may have wire trimmings in the connector shorting the pins out. Whenever you suspect an adapter is no longer working properly, plug on your SHORTING TEST BLOCK and check it out!
Whatever test interfacing scheme you use to test your cables, backplanes, harnesses, PC boards or what-have-you, it is usually fairly easy to make a test block out of a mating connector to test the interfacing you are using.
LABEL TEST BLOCKS WITH CORRECT SIGNATURES
Remember, it is very important to label all your Testing Blocks with the KNOWN GOOD Signatures. If you have any questions about this explanation of shorting blocks or any other test fixturing needs please call us at1-800-441-9910.
Option 2:
The Verification Test Plug
In this option we have done all the work so you don’t have to. The Verification Test Plug family of products are provided as a means for testing, troubleshooting, and verification of Cirris Signature Adapters. This is done by placing a mating connector with a known pattern and signature onto the adapter and verifying that the results are achieved as expected.
Verifying the adapter with these test blocks is as simple as these steps.
Set tester resistance threshhold to under 1 ohm.
Remove all adapters from all positions on the Cirris Signature tester being used.
Install the adapter to be tested and verified into adapter position J1.
Note the desired J1 signature from the label on the mating Verification Test Plug for the adapter.
Connect the mating Verification Test Plug onto the adapter connector.
Perform Learn on the tester.
Verify that the correct signature was received. Adapter signature & Test Plug signature.