

First Pass Yield – Part 2
This article is the second in a 4-part series:
Part 1: Continuous Improvement for Cable/Harness assembly
Part 2: Divide and Conquer your BAD Cables/Harnesses
Part 3: Getting Quality Right the First Time
Part 4: Measuring Success: Why Put a Dollar figure on Quality Improvement?
Divide and Conquer Your Bad Cables & Harnesses
– Our In-House Success Story –
Using First Pass Yield (FPY) to Improve Quality!
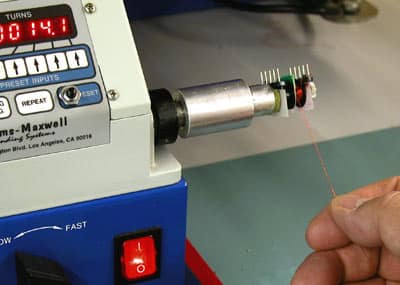
We wind and terminate a small transformer for use in our cable testers. Over time, the first pass yield had fallen to 70%. Assemblers did not know what was wrong or how to fix the problem. The transformer also had a high failure rate in testers returned for service.
Today we have >99% FPY and do not see field failures in these transformers. What changed? We have a story to share about how we achieved such success and how it relates to getting your cables to pass consistently.
Our assemblers would build up a batch of transformers, test them, and throw away about 30% that did not work. There was no visibility on this quality metric. It was something management was surprised to discover when looking into complaints from production about how difficult the transformers were to assemble. Visibility would have motivated us into taking action. First Pass Yield (FPY) is now a standard metric in our company for everything from transformers to cables and printed circuit boards to provide that visibility.
Step 2: Treat Defective Assemblies as Gold
So, what did assemblers do with the defectives? They disappeared into the garbage! The old miner would say, “There’s gold in them thar hills”. We say, “There’s gold in them thar BAD assemblies.” In some ways defective assemblies can be more valuable than a good assembly, if you mine them properly for information. Once we discovered just how bad our problem was, we started having the assemblers put a “gold star” on transformers that failed and save them to evaluate what went wrong.
Step 3: Evaluate Most Common Causes
After reviewing the first fallout of a batch of transformers, we discovered each secondary transformer winding, composed of very fine magnet wire that should measure about 50 ohms, was open. Using a Cirris Which-Ender, a simple opens-detection tool, we determined which of the two terminals on the transformer was open. Under magnification, we could see the fine magnet-wire was either broken just before the soldered connection or it was not well soldered. We experimented with the soldering iron used and found the magnet wire would become extremely brittle if heated too much for too long. Yet, too little heat would leave a cold solder joint between the magnet wire and the transformer terminal.

One solution would have been to use a larger gauge magnet wire but there was not enough room in the transformer for all the windings. Instead, we experimented with soldering temperature and time and found a consistently reliable connection could be made. We trained the assembler in interpreting defects and gave him a Which-Ender and an eye loop. He could now diagnose his own errors and adjust his soldering process as needed.
Step 5: Build & Test in Single Piece Quantity and Track FPY
In a very short time the assembler was able to reach >99% first pass yield on the transformer. He modified soldering temperature and consistently applied heat. He knew what to look for when a defect occurred and quickly corrected any process problem. He took great pride in the FPY scoreboard above his workstation. In addition, he trained others in the same process and they quickly achieved the same results.
How it relates to Your Cable/Harness Quality
Clearly, you would not tolerate a scrap rate of 30%. Yet, we often underestimate the value of learning from our errors. When common problems are fixed by people who test and these people are independent from those who make the errors, expect to find some great opportunities for quality improvement.
Let’s consider the steps we went through and identify some resources
Step 1: Establish a Quality Metric
If you don’t have a means of making defects known and visible, you don’t know if you have ‘Gold in them thar BAD assemblies’ or not. Sometimes just having an overflowing bad bin can be all the visibility you need. Getting real defective numbers helps to get real financial numbers to demonstrate the value of improvements. To review quality metrics, see our information on First-Pass-Yield
Step 2: Treat ‘BAD’ Cables as Gold
If the learning from defects could mean thousands of dollars of waste elimination, how would we treat these bad cables? We are not just talking about assemblies that get returned from the field but assemblies that are not built right from the start. The information about the kind of defects has great value when we use it in continuous improvement. If defects are collected without action, the collection effort is just another form of waste. Who gets the learning? No one! Is the person doing the testing separate from the person doing the assembly?
Step 3: Evaluate Common Causes
The most easily identified categories are described directly from test results and easily measured with a Volt-Ohm-Meter (VOM): Opens, Shorts, (Open/Short Miswires). Usually they are easy for you to find and make up a good portion of your defects. The ‘difficult-to-see’ problems that represent weak connections and weak insulation between connections may also be present. These result in the intermittents, high resistance connections, or failed insulation in high voltage tests. Investigating the majority of problems can be done with a VOM. For the ‘difficult-to-see’ problems you may find the following two root cause analysis tables helpful:
- Table of root causes of bad connections
- Table of root causes of defective insulation between connections
Let us know of other ’causes’ you have encountered that could be added to these tables.
Root Cause Analysis does not always require digging all the way back until you find the one true root cause. There can be a casual chain that reaches back to suppliers. Or a design engineer made some decisions that made creating a quality product difficult, like our ‘fine magnet wire’ in our transformer story. We can and should look for the point of ‘high leverage’ where a problem is most easy to solve. An example from a past Cirris newsletter was ending the use of liquid ‘no clean flux’ on solder terminations that got on contact mating surfaces. Changing a process or training operators to recognize their mistakes could be your way forward. So, look for the ‘gold’ in your bad assemblies. If you find the problem and then stop, you have settled for ‘Fools Gold’!